June 2010 New Arrival

Tattered Angels

Glimmer Kits


Glimmer Screens
Looking for a versatile tool to add something special to your project? Our Glimmer Screens - Fanciful Stencils are a re-usable set of 9 heavy-duty plastic, large stencils. Fanciful Stencils are the first part of an expandable series of Glimmer Screens. Use them with Glimmer Mist as a mask to make background patterns, use them for dry embossing, even use them as a stamp!


Tattered Trinkets
Vintage skeleton like keys sold in a three pack and offered in a matte black finish


Glimmer Glass
Imagine glimmering possibilities and endless inspiration with Glimmer Glass. These transparent overlays add the perfect accent to your scrapbooks, handmade cards and crafts. Acid-free and archival safe, these elegant adornments add beauty, dimension, and style to your creations in seconds! Distress, alter and "glimmerize" the overlays with Glimmer Mist. Yes Glimmer Mist works on Plastic and Much more!

Prismatic cardstock comes in 70# cover weight. One side of the sheet represents a fine art watercolor texture while the other side is smooth. These new finishes increase the versatility in all aspects of printing, scrapbooking, rubberstamping, paper crafting, card and invitation making.


Maya Road Chipboard and Cotton Ribbon


Bo Bunny
Peach Lane Line
Absolutely Beautiful!!!


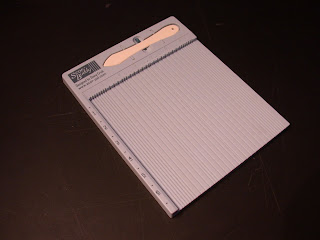
SCOR-BUDDY mini Scor-Pal scoring tablet
The Scor-Buddy was designed for card makers and has grooves every 1/4" across the board, plus 1/8" grooves for the first and last inch of the board. It measures approx. 9" x 7.5" and has a fence down the left side. A free Scor-Tool is included in the snap-in holder and it comes with its own faux ultra suede carry tote.
Brass Stencils Now Here...by Dreamweaver


Using Embossing Paste with Brass Stencils
This technique looks especially nice on dark card stock. It has a sharper edge to it than either dry or thermal embossing and, like dry embossing, it can also be stenciled with color. When iridescent powders are added to the regular embossing paste, the embossing almost has an "Indian sandpainted" look to it.

1. When using embossing paste on the brass stencils, you need to work quickly, because the paste sets up in 20-40 minutes and you don't want it to dry into the fine bridgework of the brass stencils.

2. Make sure you are working on a hard flat surface and the stencil needs to be flat against the surface, because, if it is bent, the paste will pull under the bridges and smear.

3. Tape out the edges well with removable tape.

4. Pick up the paste on the bottom of the metal palette knife and smooth over the stencil's cut out areas as if applying icing to a cake. Now the paste on the stencil is about 1/8"- 1/4" thick. At this point, scrape off the excess paste until all the holes are filled evenly and the stencil surface is smooth.

5. Immediately take off the tape and pick up the stencil from the paper--lifting it off in a straight up manner as much as possible. It is important to clean the stencil off immediately, so drop it into a pan of water until you have time to scrub it with a vegetable or nail brush. If there is a film or residue of paste on the stencil, use a rubber stamp cleaner that removes permanent inks. Apply it generously and scrub with a dry paper towel.

6. Set aside the paste project for 20-40 minutes and, when dry, put the cleaned stencil back in place and stencil with a variety of mediums.

STENCILING ON REGULAR EMBOSSING PASTE
Iridescent Paintstiks: These have a tendency to be a bit dryer than the regular Paintstiks, but they have a wonderful opalescence to them when stenciled onto the paste. Since they are a bit dry when you initially open them, you need to scrape them off with a sharp knife and then stroke them onto a piece of wax paper or freezer paper. If there are any big paint clumps or flakes on your palette, do not pick them up with your brush. You can load your brush more heavily with the iridescent Paintstiks than with the regular paintstiks, which are creamier. After loading the brush, stencil using a circular "rouging" motion to avoid a piling of paint into the edges of the design. Paintstiks, in general, have a great shelf life and are one of the easiest mediums for beginners to work with.
Stamp pads: Most of us have a plethora of ink and dye pads for stamping. These can be used for stenciling as well. Remember though, after you load your brush with wet ink or dye, you then need to "unload" the brush. In stenciling we call this a "dry-brush" technique. If your stamp pad is relatively new, it can be very wet, so don't be afraid to press the bristles very hard into a dry paper towel or an old t-shirt to get rid of the excess wetness. Then stencil with the same circular "rouging" style used with the Paintstik medium. You can build color from light to dark by layering colors. I prefer brushes, but foam daubers or makeup sponges can be used as well. Just remember, when using these, to tap up and down rather than the "rouging" motion that you use with a brush. This keeps the wetness from pulling under the stencil.

TRANSLUCENT EMBOSSING PASTE
This new paste is applied in the same manner as the regular paste, but it dries to a glossy, translucent finish. Therefore, it can be used with iridescent powders or metallic liquid acrylic paints. Add approximately 1/2 tsp. paint or powder to 2Tbsp. paste. The mixture will have a milky look but it dries glossy and iridescent. For a more opaque rough texture that still has a bit of glossy shine, add 1 part regular embossing paste to the iridescent translucent mixture you have already made.
--------------------------------------------------------------------------------
Embossing and Stenciling on Paper

Q. What kind of paper should I use?
A. Any kind of paper you can see through when held up to the light. I have even embossed light weight poster board that is white. Dark colors are hard to see through. Textured papers tend to be a bit harder to emboss because of an increased surface area. Light weight stationery is usually referred to as text weight and these can be embossed carefully, using a light pressure and the larger end of the embossing tool.

Q. Exactly how do you get the raised effect?
A. Embossing is done by placing the embossing stencil on the front of the paper and attaching it with a small piece of removable tape. Turn the paper front side (with the stencil still attached) against a light table or window (windows only work during daylight hours). Rub the back of the paper with a small piece of waxed paper. This will make the tool slide easier. With the light illuminating the design, use a 1/16” embossing tool, or other similar blunt object, to push the paper into the stencil. Do not merely trace but push the paper down into the edges of the stencil. You do not need to fill in the large open areas. Still having trouble? Many people have the problem of putting the stencil on the front and trying to emboss by merely outlining the design. Remember, the stencil is on the front and the embossing is done on the back of the paper. The stencil should be hidden from your view so the only way you know where to push is to have a light under the paper.

Q. How do I add color?
A. Don’t remove the stencil from the paper. Leave it right in place on top of the embossing. Now it can be stenciled. Use the instruction sheet on paintstiks to know how to use this medium.

Q. How do I know which color to use first and how can I make other colors by mixing?
A. Always start with the lightest colors first, then medium, and then darker colors last. Using the primary colors, yellow, red, and blue, you can make green, purple, and orange. These are called secondary colors. Also, if you use the following formula, only three brushes are necessary:

#l brush-light color : Use only for yellow
#2 brush-medium colors: Use for red and orange
#3 brush- dark colors: Use for blue, green, and purple

Q. How do I actually make the secondary colors?
A. Yellow + red = orange: Always base coat with yellow first
Yellow + blue = green: Always base coat with yellow first
Red + blue = purple: Always base coat with red first

Q. What do I do when I have orange in my brush and want to make red?
A. Rub the orange out just a bit on a dry paper towel and pick up a fresh load of red on the brush.

Q. What do I do if I have green in my #3 brush and I want to make purple?
A. Again, rub out the green on a dry paper towel and pick up fresh blue. You don’t have to get rid of all the color, just a quick dry scrub will do. The blue pigment is very strong and, when used lightly, will go a long way.

Q. I accidentally used my yellow #1 brush in the blue to make green. How do I get rid of the contamination?
A. You can try to scrub it out on a dry paper towel, however, if that doesn’t work, you need to actually wash and dry the brush before you can have a pure yellow in it again. This is why the #1 brush should only be used for yellow. It is a light pigment and, therefore, can be used more strongly than the blue. Don’t be afraid to load heavier with the #1 brush.

Q. How do I know how much to load on my brush?
A. Usually, just a swish of color is needed. As you play with it, you will get a feel for how much. You may want to test it on a piece of scrap paper until you gain more experience. As the paint in the brush diminishes, more pressure is required. This is hard to measure, however, and just practicing will perfect it.

Q. When and how do I wash my brushes?
A. Clean the brushes when you are finished for the day. They need to be dry before they can be used again. Paintstiks are oil based and can be cleaned out of the brush with paint thinner, which is then rinsed out with mild detergent and water. If you are looking for a nontoxic cleaner, there are several on the market. I use “ The Master’s Brush Cleaner”, which is simple to use. Just rinse the brush with water and rub it in the cleaner. Work the cleaner into the bristles by rubbing it into the palm of your hand. Alternate between the cleaner and water until you don’t see any more color worked out of the bristles. Rubber banding the bristles will make them dry straight.